Windows 10 automatically downloads all updates and install them without informing the user. Users who use the slow Internet connection can face slowdown obstacle in Internet speed when Windows is downloading updates in the backdrop. In this tutorial, we’ll show you the methods to turn off automatic update in Windows 10, or set Windows to inform you before downloading or updating.
Without wasting much time let’s discuss the methods to turn off windows 10 updates.
Ways To Turn Off Windows 10 Updates Permanently
Here we’ll explain the Four different methods to turn off windows 10 updates and each method have got several steps. So sit back and follow these steps to get rid of the updates notifications permanently:
Method 1: Turn Off Automatic Update By Disabling the Service
Step 1: Press the Windows Key + R, and to Open Service Manager type “services.msc” in the Run dialog box, and click Enter.
Step 2: When the Services Manager opens, scroll down and search for the service “Windows Update” in the list.
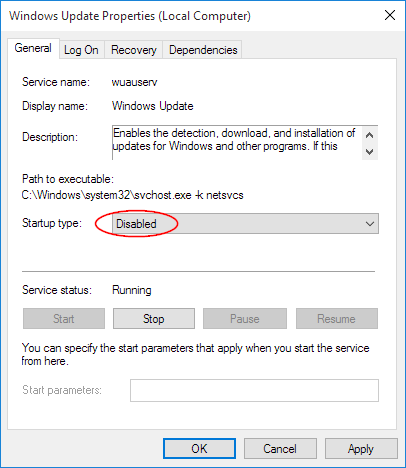
Step 3: Open Properties window by making a double click on the Windows Update service. Stop the service and select Disabled from the Startup Type drop-down menu.
This will disable Windows Update altogether.
To re-enable Windows Update repeat these steps, but turn the Startup Type to Automatic and restart your computer.
Method 2: Turn Off Automatic Update Using Group Policy
Step 1: Press the Windows Key + R to open the Run dialog box, type “gpedit.msc”, and press Enter.
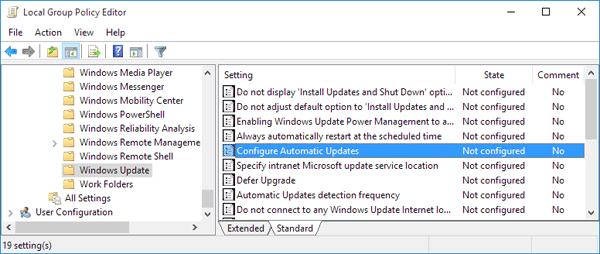
Step 2: When the Group Policy Editor opens, drive to Windows Update by following this pathway:
Got to Computer Configuration then to Administrative Templates, then to Windows Components and then to Windows Update
Step 3: Now in the right pane, double-click on Configure Automatic Updates.
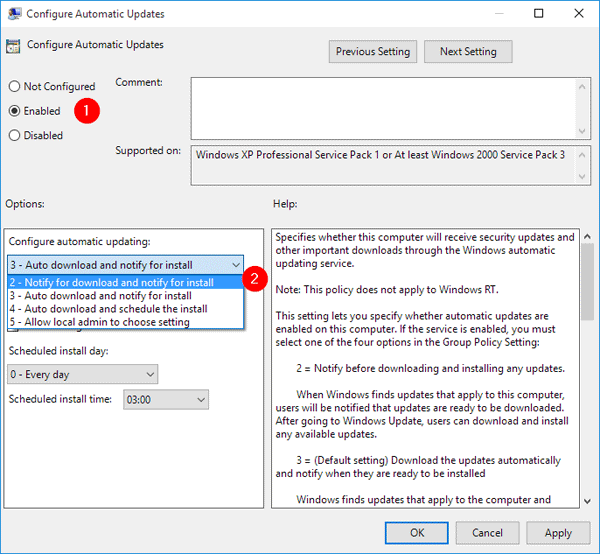
Step 4: From here you can set the updates to Disabled or set the following options:
- Notify for download and notify for install
- Auto download and notify for install
- Auto download and schedule the install
- Allow local admin to choose a setting
Step 5: Click Apply and then OK. Reboot your computer to see the changes.
Method 3: Turn Off Automatic Update from Settings Charm
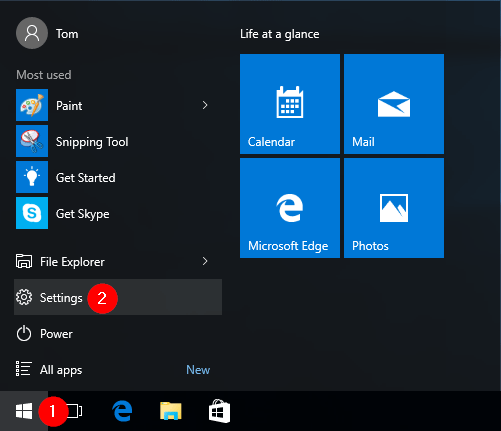
Step 1: Click on the Start button. Select Settings when the Start Menu appears.
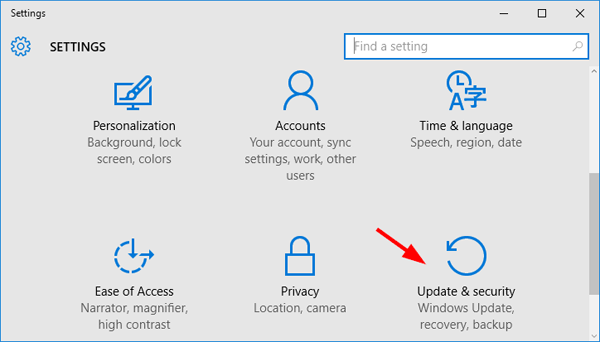
Step 2: The Settings charm should open. Click Update & security.
Step 3: Click Advanced options at the bottom of the Windows Update pane.
Step 4: Select “Notify to schedule restart” instead of “Automatic (recommended)”. It’ll prevent Windows from automatically restart your computer after downloading and installing updates.
Step 5:
Now allow “Defer upgrades” option.
Now, you won’t get any Windows Update notification for several days or months. But security updates will be downloaded immediately.
Method 4: Turn Off Windows 10 Automatic Update By Using Registry Editor
Step 1: Press the Windows Key + R, type “regedit” into the Run dialog, and press Enter.
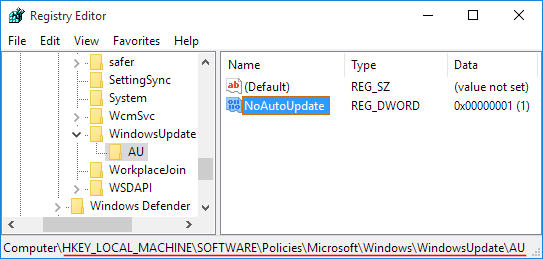
Step 2: When the Registry Editor opens, navigate to:
HKEY_LOCAL_MACHINE\SOFTWARE\Policies\Microsoft\Windows
Step 3: In the left-side pane, right-click on the Windows key and create a new subkey and set its name as Windows Update.
Step 4: Right-click on the WindowsUpdate key and create another subkey named AU.
Step 5: Now choose AU key and in right-side pane build a new 32-bit DWORD value NoAutoUpdate and make its value data to 1.
Step 6: Restart your computer and Windows won’t automatically download and install any update any longer.
After finishing the steps, Windows 10 will not install updates automatically. Though you’ll get notifications as soon as new quality updates are available, they won’t download and install till you allow them manually.
You can anytime use the same directions to reestablish the initial settings.
Which method worked for you?
Let us know if this guide has served you by dropping your comment about your experience. Also, Please like and share this blog to assist others.
Related Article: Top 10 Free Data Recovery Softwares For Windows





Leave a Reply